Looking for reasons to consider a metal roof? Metal roofs withstand the glare of UV radiation for decades. They fend off extreme weather and absorb the violent energy of a hailstorm without incurring so much as a dent. Investing in a metal roof for your property is a good move – Low maintenance, low cost, and it’s becoming a trendy roofing material.
But installing a watertight metal roof requires a certain skill set and the right tools – it’s not like you can pull off a DIY installation yourself unless you have the know-how. So, we’re going to give you a brief rundown of how professional contractors assemble the components required for metal roofing system installations.
Before diving into installation, it’s helpful to understand how the system comes together—from how metal roofing components are manufactured to how metal panels are made, each step plays a critical role in the roof’s performance and longevity.
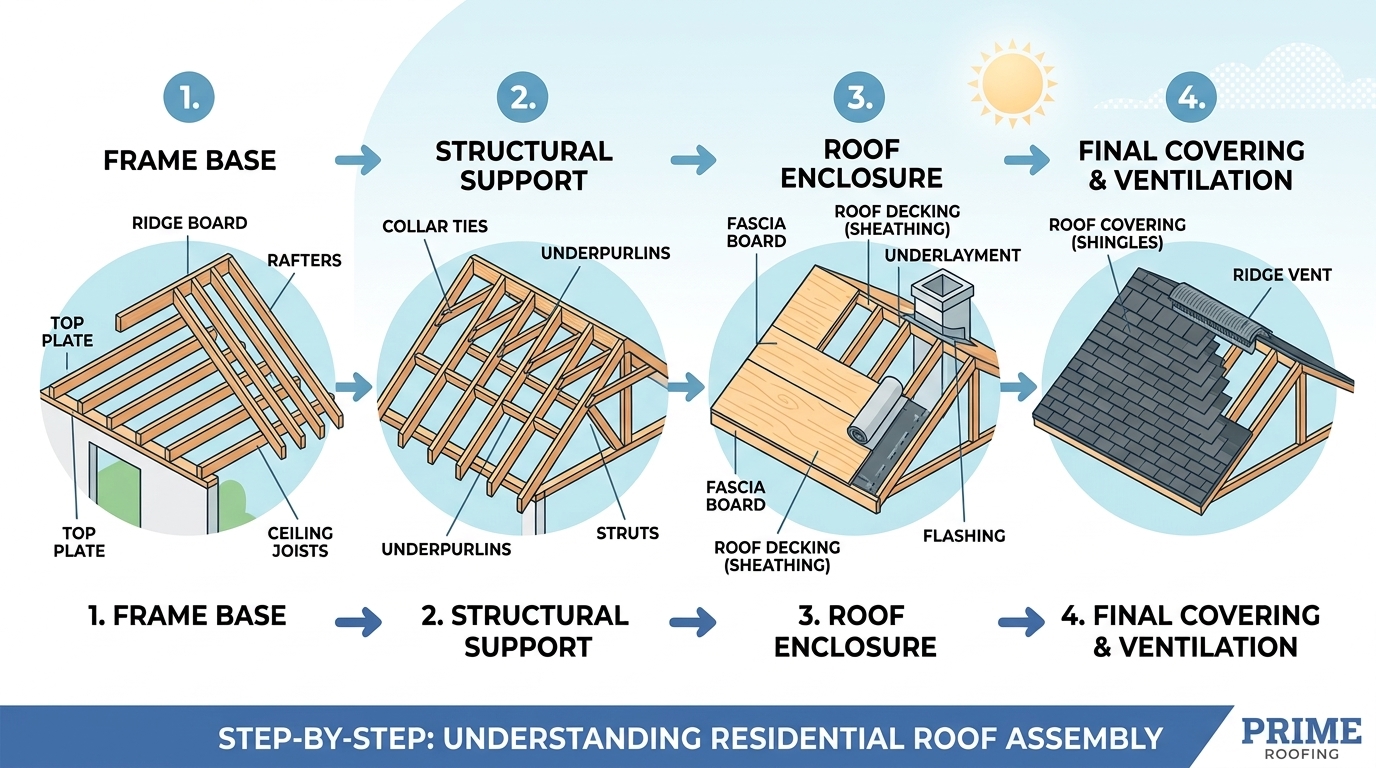
Prepping the Roof for Panels
Before you rush into laying the panels, it’s wise to prep the roof surface.
For Solid Decks: Fit a water barrier to keep water out and protect the roof substructure.
For Open Rafters/ Purlins: The natural airflow in the roof means you can skip the vapor barrier.
Setting the Stage with Trim and Closures
With the prepping out of the way, it’s time to move on to the trim and closures.
Eave and Valley Trim: Fasten the trim to the roof’s substructure, giving it a clean edge that redirects water away from the roof.
Sealant and Closures: Follow the manufacturer’s guidelines to get a watertight joint.
Laying the First Panel: Starting Right
With the prep work done, it’s time to start laying the panels:
Panel Placement: Panels usually come with protective film, so strip them away before laying them. Align the panels to the details in your layout plan and start at the gable edge or eve.
Lap Direction: Get started on the right foot by following the manufacturer’s directions for recommended lap direction.
Square It Up: Square the first panel with the edge of the roof, or you’ll get off-track later in the installation.
Choosing and Installing the Right Fasteners
We’re installing an exposed fastener roof in this example; here’s the right hardware for the job.
- Structural fasteners secure 26-gauge corrugated metal panels to steel purlins. Set them up opposite the panel’s major rib.
- Stitch or side-lap fasteners screw into overlapping panels at lap points with a snug fit that won’t come loose.
Step-by-Step Guide to Fastening Metal Roofing Panels
Prep the Eave: You need screws on both sides of every rib. Use the foam closure strip to align them with the eave to seal the edge.
Space the Fastener Rows Properly: Space rows 24 inches apart with one screw on the overlapping side of each rib.
Work from Bottom to Top: Start fastening the first panel at the bottom near the eave. Work up to the ridgeline in rows.
Go For Flush Fitment: If you screw the fastener in crooked – start again. Flush fitment ensures a watertight seal.
Tighten and Torque Properly: Don’t overtighten the screws and strip them. You just need enough biting power to compress the rubber gasket to the screw head.
Finishing Things Off
Once you have the technique down, it’s just a matter of rinse and repeat. The critical thing is to review each new panel for correct alignment, or you could end up wasting a lot of time redoing the job. Use outside closures and sealing tape to finish the gable/rakes, ridge, and hip caps, and sweep up any filings that might cause rust spots.
This technical process is best left in the hands of a licensed roofer, that is highly trained and experienced in metal roofing installations.
For expert support with metal roofing systems or to ask questions about metal roofs, call Prime Roofing at (904) 530-1446.